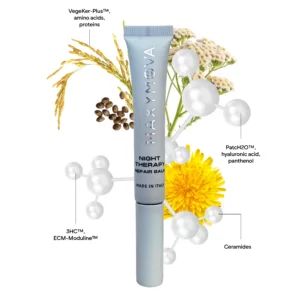
MAST PRO NEEDLES AREOLA AND SCAR CAMOUFLAGE - Beautifeau

Complete your treatment products with

MAST PRO NEEDLES AREOLA AND SCAR CAMOUFLAGE


MAST PRO Needles – Precision, Stability, and Performance

For permanent makeup artists seeking flawless precision and high stability


MAST PRO Needles – Precision, Stability, and Performance

For permanent makeup artists seeking flawless precision and high stability

Shipping en returns

Achieve flawless PMU results with MAST PRO PMU Needles, designed for precision, smooth pigment flow, and minimal skin trauma. Follow these steps for optimal application:


  1. Choose the Right Needle for Your Technique
  • 3P / 0.18 (0403RL) – A 3 Round Liner (3RL) with 0.18mm ultra-fine needles, perfect for soft shading and natural hairstrokes. This is a preferred choice for traumatized skin and lip treatments.
  • 1P / 0.25 (0801RL) – A 1 Round Liner (1RL) with 0.25mm diameter, ideal for delicate eyeliner work and precise detailing. This needle is best suited for mature and thin skin, often used for precise and detailed work.
  • 1P / 0.30 (1001RL) – A 1 Round Liner (1RL) with 0.30mm thickness, great for defined lip contouring and crisp brow outlines. This is the most universal needle, making it a go-to option for many PMU procedures.
  • 3P / 0.30 (1003RL) – A 3 Round Liner (3RL) with 0.30mm diameter, best for filling in brows, lip blush, and soft shading. This needle is especially useful for Infralash applications.
  • 1P / 0.35 (1201RL) – A 1 Round Liner (1RL) with 0.35mm width, providing deeper pigment implantation for bold, long-lasting color. Commonly used by Eastern European artists, this needle is also suitable for hairstrokes.


2. Insert and Adjust the Needle

  • Securely attach the needle to your PMU machine for stability and precision.
  • Adjust depth and speed depending on the treatment:
    • Light strokes and shading – Use shallower depth and slower speed.
    • Bold outlines and deep saturation – Increase depth and maintain steady pressure.


3. Apply with Control and Consistency

  • Work in light layers to ensure even pigment saturation.
  • Maintain consistent pressure to prevent patchy color application.


4. Maintain Hygiene and Needle Safety

  • MAST PRO needles are single-use and EO gas sterilized for maximum hygiene.
  • Dispose of used cartridges immediately after each session to prevent contamination.


Upgrade your PMU technique with MAST PRO Needles, trusted for precision, durability, and flawless results.

Details
  • Product Name: My Lamination Step 1 Lifting Cream+
  • Type: Professional lash and brow lifting cream
  • Function: Creates new curl for eyelashes and defines new direction for brows; prepares hairs for Step 2 Neutralising Cream+
  • Formula: Fast-acting cream with thioglycolate acid salts; gentle yet effective
  • Processing Times:
    • Thin lashes: 8–9 minutes
    • Medium lashes: 9–10 minutes
    • Thick lashes: 11–12 minutes
  • Texture: Smooth cream formula for precise, safe application
  • Key Benefits:
    • Reshapes and softens hairs without damage
    • Leaves lashes and brows elastic, flexible, and radiant
    • Tailored application times for different hair thicknesses
    • Professional-grade performance – Made in Italy
  • Safety Notes:
    • For Professional Use Only (minimum 6 months’ experience recommended)
    • For External Use Only
    • Keep out of reach of children
    • Avoid direct contact with eyes and skin
    • Wear suitable gloves during use
    • Do not use if eyes are injured, infected, or irritated
    • Discontinue use if irritation occurs
    • Not for persons under 18 years
    • Not suitable during pregnancy or lactation
    • Contains thioglycolate acid salts
  • Volume: 10 ml
  • PAO (Period After Opening): 1 month
  • Country of Origin: Italy
How to Use

  1. Assess Lash Type
    Before application, analyze the thickness of the client’s lashes to determine the correct processing time:

    • Thin lashes: 8–9 minutes
    • Medium lashes: 9–10 minutes
    • Thick lashes: 11–12 minutes
  1. Prepare Lashes
    Cleanse the lashes thoroughly using My Lamination 4 in 1 Cleansing Foam to remove any dirt, oil, or makeup.
    Apply a silicone shield of the correct size to the upper eyelid using My Lamination Lash Lift Glue, then carefully position the lashes onto the shield with an applicator.
  2. Apply Lifting Cream+
    Using a microbrush or applicator, apply a thin, even layer of Step 1 Lifting Cream+ to the lash curl area, avoiding the tips of the lashes.
  3. Processing Time
    Leave the cream on according to the lash type (refer to timings above).
    Do not cover with plastic wrap during this stage.
  4. Remove Product
    After processing, remove any excess product with a slightly damp cotton swab or makeup brush, always moving in the direction of lash growth to protect the hair structure.

Professional Tips

  • Always follow with Step 2 Neutralising Cream+ to secure the curl and set the new lash structure.
  • Ensure processing times are tailored to lash type to avoid over-processing.
  • For best results, complete the system with Step 3 Hydrating Serum+ for maximum nourishment and shine.

Ingredients

Aqua (Water), Ammonium Thioglycolate, Cetearyl Alcohol, Oleyl Alcohol, Glyceryl Stearate, PEG-100 Stearate, Parfum (Fragrance), Ammonium Hydroxide, Hexyl Cinnamal, Hexamethylindanopyran, Benzyl Salicylate, Linalyl Acetate, Dimethyl Phenethyl Acetate, Alpha-Isomethyl Ionone.

Complete your treatment products with

Our Bestsellers

Search